

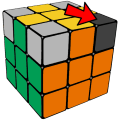
 I used capital letters to mark the clockwise face rotations: F (front), R (right), L (left), U (up), D (down).
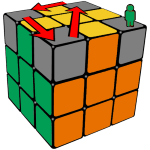
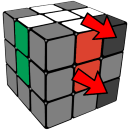 When the white edges are solved we can move on to solve the white corners.
 twisting the corner in each step. Using this trick you can solve each white corner in less than 6 iterations.
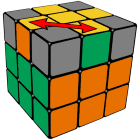
 When a center layer piece is in its correct position, but oriented incorrectly then use the same algorithm to take it out, inserting another piece to replace it temporarily.
 1. Hold the cube in your hand having an unsolved yellow corner in the highlighted top-right-front position.
 Ir2110 Library For Proteus 8 Upd Repack Jun 2026
Second, the . He assigned it a standard DIP-16. Easy.
.ENDS
To get the IR2110 High and Low Side Driver working in Proteus 8, you usually don't need a special external library "piece" because it is often included in the default library. If it is missing or you need a specific updated version, follow the steps below. 1. Check the Default Library
3. How to Download and Install the IR2110 Library in Proteus 8 Step 1: Download the Library Files
If you cannot find a pre‑made library that works with your version of Proteus, or if you prefer full control over the model, you can create your own simulation model. This approach requires more effort but is entirely feasible using a SPICE model from the manufacturer. ir2110 library for proteus 8 upd
: Frequently hosts simulation-ready models and detailed tutorials for MOSFET drivers. Installation Guide for Proteus 8 To add a downloaded IR2110 library (typically consisting of files) to your software: IR2110 Symbol, Footprint & 3D Model by Infineon - SnapMagic
To accurately simulate circuits involving the IR2110 in Proteus 8, a dedicated library is necessary. The library provides a virtual model of the IR2110 IC, allowing users to simulate its behavior and test their designs. Without this library, users would not be able to simulate and test their circuits involving the IR2110.
Look for reputable electronics design repositories such as SnapMagic for official symbols, or community-driven sites like ElectronicsTree for ready-to-use library packs.
You must fully close and reopen the software for the new "piece" to appear in the search. 3. Importing Third-Party Parts (CAD Models) If you downloaded a component model (like a file) from sites like Import Parts in the Schematic Capture window. Select File and browse for your IR2110 file. Import Part and follow the prompts to add it to your local library. support.snapmagic.com 4. Common Troubleshooting: "No Library Found" Second, the
For a more systematic approach to library management, use Proteus 8's built-in Library Manager tool. This tool can help you:
The download should typically include IR2110.LIB and IR2110.IDX or a .ZIP file containing these. 3. Step-by-Step Installation Guide (Updated) Follow these steps to install the library in Proteus 8:
The IR2110 is a high-speed, high-power MOSFET driver IC commonly used in power electronics applications. To create a useful feature for the IR2110 library in Proteus 8, let's focus on adding a updated model that accurately simulates the IC's behavior.
Raj scrolled through the forum, eyes scanning threads from hobbyists and students frustrated by a missing IR2110 driver in Proteus 8. He’d fought the same battle: trying to simulate a half-bridge MOSFET driver, only to find Proteus’ component library lacked a ready-made, well-behaved IR2110 model. The result was patched-together circuits, unreliable logic-level behavior, and simulation runs that ended with unexplained floating nodes. Check the Default Library 3
(Note: The 'Data' folder might be hidden or located in ProgramData depending on your installation) Copy and Paste : Move the downloaded files into this directory. Restart and Verify
Designed to bootstrap operation, allowing the high-side driver to operate at voltages up to 500V500 cap V 600V600 cap V
Copy all the files from the extracted LIB folder. Then, navigate to:
To get the IR2110 working in your simulation, you must replicate the standard bootstrap circuit: